

Anodot Agent - SQL to S3
Overview
Use the Anodot SQL to S3 agent to stream SQL records to Anodot with an S3 bucket as an intermediary:
-
Anodot SQL to S3 agent
a. Collects data records from your database.
b. Stores the records as files in an S3 bucket. -
Anodot S3 Data collector
a. Collects the files and converts them to Anodot time series metrics, containing measures and dimensions.
The diagram below shows the prerequisite components:
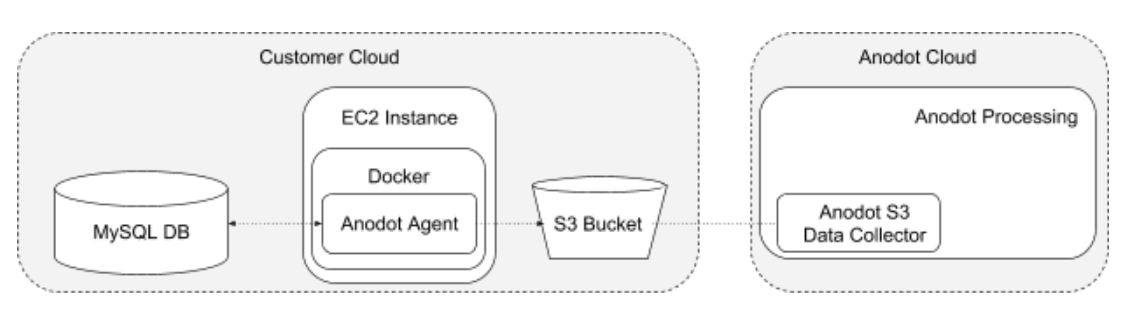
The following sections outline the steps to install and configure the Anodot Agent:
Prerequisites
- A relational database with your data records.
- An instance running docker:
- The instance should have an IAM Role with the following policy, to be able to send data to the destination S3 bucket.
- A destination S3 bucket.
- With the required policy by Anodot S3 data collector
- Your Anodot Account and an S3 Source linked to the S3 bucket.
Anodot Agent Installation
-
On Ubuntu Server 16.04 LTS or Redhat Enterprise Linux 7.5 EC2 instances run:
curl -o setup.sh https://bitbucket.org/anodotcommunity/anodot-agent/raw/master/scripts/setup.sh && chmod +x setup.sh && ./setup.sh
-
Otherwise, follow the manual installation process
Anodot Agent Configuration
- Connection to the database
- Destination S3 bucket
- Query schedule
- Stream id
- Database query
- Destination folder within the S3 bucket
Config File
The config file is a YAML file for readability and ease of use with text editors.
source:
  handler: anodot_agent.sources.sql
  dburl: <connection string to the db>

destination:
  handler: anodot_agent.destinations.s3csv
  bucket: <destination bucket>

scheduler:
  interval: 1d

streams:
- id: <stread_id>
  source.query: <select * from random_table_vw where ts >= '{{start_dttm}}' and ts < '{{end_dttm}}'>
  destination.folder: <folder within the S3 bucket>
Setup Parameters
| Section | Parameter | Description |
|---|---|---|
| Source | Section header holding the connection | |
| handler | string to the db anodot_agent.sources.sql | |
| dburl | Connection string to the database, holding postgresql://username:password@host: | |
| Destination | Section header holding the bucket name | |
| handler | anodot_agent.destinations.s3csv | |
| bucket | Destination bucket name | |
| Scheduler | Section header holding the query interval | |
| interval | 1d - Daily 1h - Hourly 15m - Every 15 minutes 5m - Every 5 minutes 1m - Every 1 minute | |
| Streams | Repetitive section header, enabling multiple source queries and multiple destinations. | |
| id | Unique name for the source+destination combination | |
| source.query | The query to run over the db {{start_dttm}}' < '{{end_dttm}} | |
| destination.folder | Determine the the sub-folder to Output filename pattern will be: YYYYMMDDHH.csv |
Source.query Template Variables
| Variables | Expected Format |
|---|---|
| {{start_dttm}} | Timestamp at start of interval Expected Format: YYYY-MM-DD hh:mm:ss |
| {{end_dttm}} | Timestamp at start of next interval {{start_dttm}}+Interval Expected Format: YYYY-MM-DD hh:mm:ss |
Anodot Agent Activation and Monitoring
Activation
When setup is complete, run the agent:
docker run -v {my-agent-data-dir}:/anodot-agent-home/ --name anodot-agent -d anodot/anodot-agent
To update agent configuration and reload it:
aatool load_config {my-YAML-config-file}.yaml
Monitoring
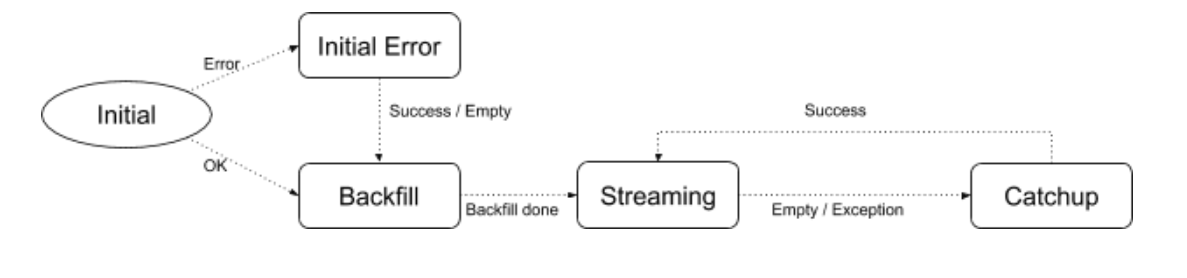
Anodot Agent Stream States
From the S3 Bucket to Anodot
Use Anodot S3 Data Collector.
Appendices
Appendix 1: Manual Installation Instructions
-
Activate Docker
- On mac: docker.app
-
Open a terminal session
-
Get the latest Anodot docker release from the docker hub docker pull anodot/anodot-agent

-
Create a directory on a persistent volume to store the agent database
mkdir {my-agent-data-dir} Note: {my-agent-data-dir} should be an absolute path on the machine hosting the docker. -
Put the YAML config file {my-YAML-config-file}.yaml in the host directory {my-agent-data-dir}
-
Run the agent
docker run -v {my-agent-data-dir}:/anodot-agent-home/ --name anodot-agent -d anodot/anodot-agent Output: An id for the running docker -
Enter the container
docker exec -it anodot-agent /bin/sh Output: A prompt inside the docker -
Enter the mounted directory
cd /anodot-agent-home -
Set the configuration YAML file (see above for additional details)
-
Load the configuration yaml file
aatool load_config {my-YAML-config-file}.yaml
Appendix 2: Instance Role Policy
{
    "Version": "2012-10-17",
    "Statement": [
       {
           "Sid": "Stmt1520872574434",
           "Effect": "Allow",
           "Action": "s3:PutObject",
           "Resource": "arn:aws:s3:::<destination bucket>/*"
       }
     ]
}
Updated over 1 year ago